Rich Text Editor Pro v23.2 - Update and Upload Workflow

Wednesday, October 25, 2023
Welcome to the next chapter in our exploration of Rich Text Editor Pro. In my previous articles, I introduced the concept of uploading images, the importance of efficient image management within Oracle APEX, and a brand-new sample application. Today, we embark on a journey to uncover the magic behind our plug-in's update and upload workflow, a game-changer in rich text editing with images in APEX applications.
Perhaps you've wondered about the best approach for seamlessly integrating images into your content. In this article, we'll answer this question and explain why our update and upload workflow is worth your attention.
But before we dive into the specifics, let's first take a closer look at how traditional rich text editors handle image uploads and why, at first glance, it seems like a reasonable approach. We'll explore how immediate image uploads can sometimes lead to unforeseen challenges, including storage constraints and content organization.
Next, we'll transition to our journey with Rich Text Editor Pro, where we'll uncover the evolution of our upload mechanism. It all began with a simple idea from our initial users:
"Should images be uploaded immediately upon insertion into the editor?"
This seemingly straightforward question led me to a profound shift in managing images within our rich text editor.
So, what makes our Rich Text Editor Pro so compelling? The answer lies in its efficiency, flexibility, and ability to solve the very challenges we've encountered. In the following sections, we'll delve into the mechanics of update and upload workflow, explore its benefits, and guide you through its configuration. By the end, I hope you'll understand why this approach is a game-changer for writing rich text documents using Oracle APEX.
Forgotten Draft Documents
Many traditional WYSIWYG editors adopt the practice of immediate image uploads as soon as an image is added to the editor. This approach might seem convenient at first glance, allowing users to include images in their rich text documents seamlessly. However, this seemingly straightforward process can lead to unexpected challenges, particularly when managing draft documents.
Consider a scenario where an end-user works on a rich text document, adding images from their desktop or browser. The editor promptly uploads these images to a storage location, often the database, without waiting for the user to save the document. It's a common practice, and you might have already celebrated achieving successful image uploads in a native rich text editor.
However, this approach can introduce complications, as we discovered during the early days of our Rich Text Editor Pro. Our initial users raised a valid concern:
"Can we upload images when the end-user submits the page to save the document in the database? Currently, if a document isn't saved, we end up with uploaded images with no associated content."
This issue becomes more pronounced when users create documents with numerous images. Let's say, for instance, an end-user drags and drops fifty images from their desktop. To be optimistic, we'll assume that each image is already optimized, with an average size of 100 KB.
50 images x 100 KB = 4.8 MB
Now, imagine many such users use your application, and, likely, some draft documents won't be saved in the database. This means that, over time, uploaded images accumulate in your storage, leading to a significant increase in storage costs and potential quota limitations.
To summarize, uploading images immediately upon insertion into the rich text editor can lead to the following problems:
- User Waiting: Users must wait for all images to be successfully uploaded, causing delays in their editing process.
- Handling Upload Failures: When an image upload fails, users must identify the image within the document and deal with the error, disrupting their workflow.
- Storage Overhead: Unsaved draft documents can leave uploaded images in the database, consuming valuable storage space.
- Difficulty in Organization: Associating images with specific documents can be challenging when uploads happen immediately, especially in multiple-draft scenarios.
- Database Quota Concerns: Immediate uploads can quickly consume available database storage, leading to unexpected costs.
- Session Expiry Issues: Orphaned images may remain in the database if a user's session expires or they don't save their document.
- Version Control Complexities: Managing different document versions with various sets of images can be complex and confusing.
Update and upload workflow
Introduction
As mentioned above, our rich text editor was no better than other implementations initially. The plug-in was uploading images immediately, just like other WYSIWYG editors.
Based on customer feedback, I implemented the first approach to upload images only when the end-user submitted the page with a developer-specified request (button name). Even though it was a big improvement, the plug-in relied on the framework method, which uploaded images sequentially one by one - I described the upload mechanism enhancement in the previous article.
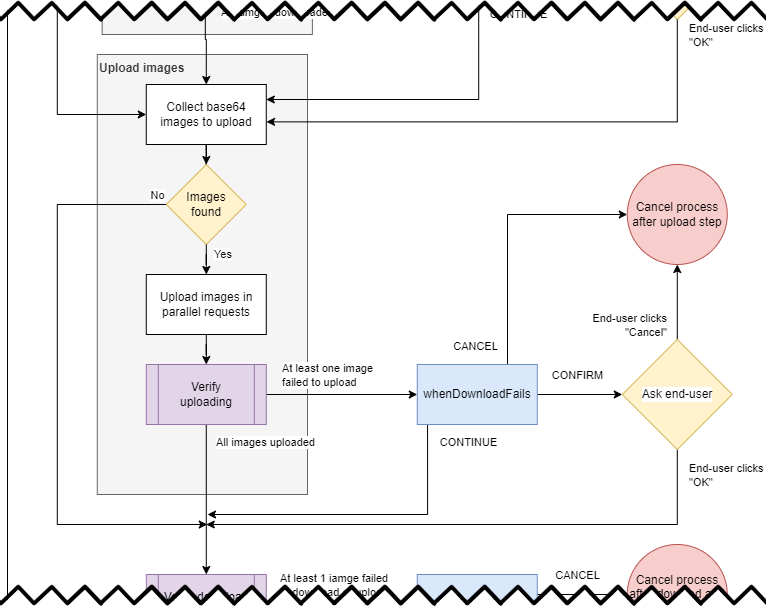
We listen to our customer's feedback, and the plug-in release 23.2 introduces a more advanced mechanism for uploading images. To illustrate the mechanism, please look at the flow diagram below:
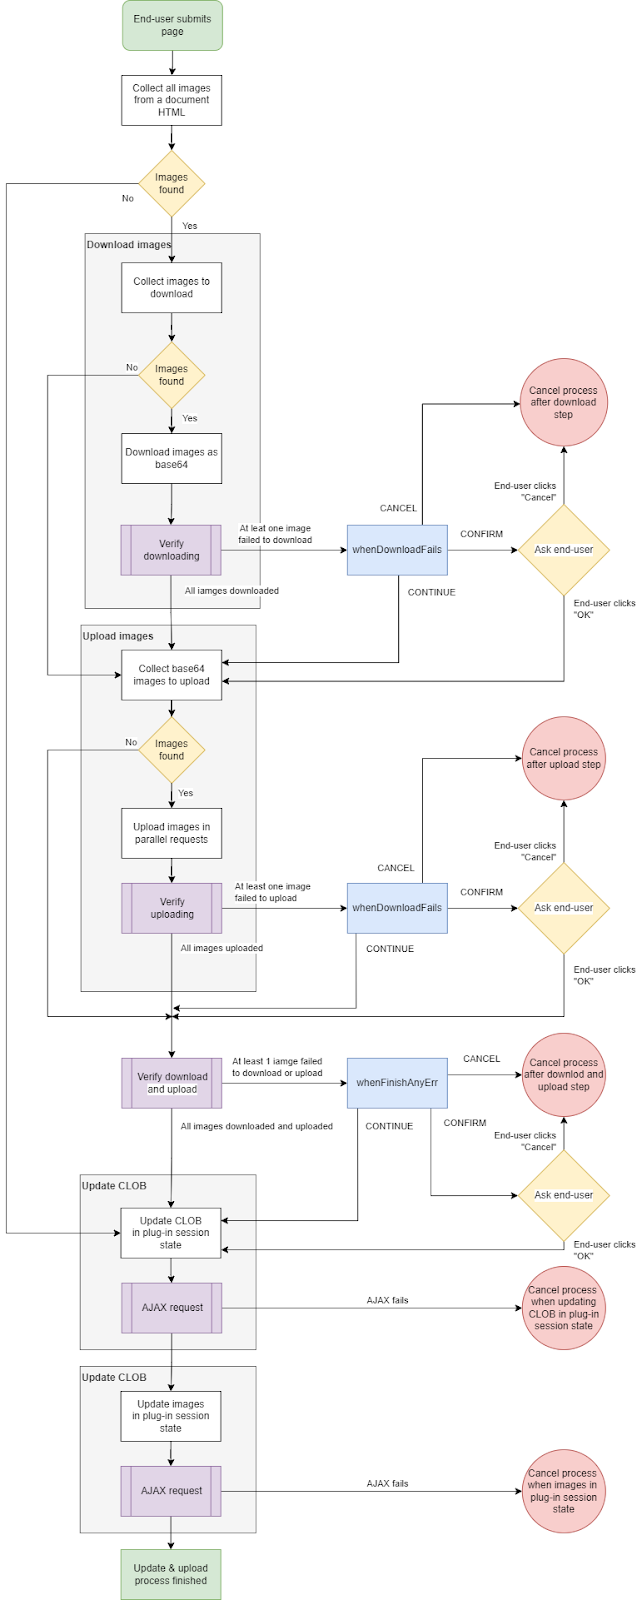
The diagram presents the flow of computations and processes, recognizing, downloading, and uploading images, followed by updating document HTML and image information in the plug-in session state.
This flow is executed whenever a page is submitted with an upload request defined in the page item attribute Upload Image(s) on Request(s) or when a supporting dynamic action Upload Images on Demand is triggered.
The key difference between page submission and dynamic action is that when a page is submitted, the plug-in re-submits the page on success with the initial request. In contrast, dynamic actions can be configured to execute optional JavaScript callbacks.
Nevertheless, the core functionality is the same for both, and I would like you to focus on the purple and blue rectangles in the flow diagram above.
The purple rectangles are plug-in verification steps, and they are executed after important steps in the update and upload workflow:
- after downloading images
- after uploading images
- after downloading and uploading images
The blue rectangles represent plug-in configurable options using the plug-in JavaScript Initialization Code.
These verification steps (purple) ensure you have control (blue) over the uploading images mechanism.
For example, if you don’t want to allow your end-users to create documents containing images added from foreign websites, you should consider canceling the upload process once the plug-in fails to download at least one image.
The upload and update workflow includes the following major steps:
- collect images embedded in a document
- download images from foreign websites
- upload images
- verification after the download and upload step
- update the document in the plug-in session state
- update image statuses in the plug-in session state
In the following sections, I will walk you through each step - fasten your belts!
Collect images embedded in a document
The first step is collecting information about images embedded in the rich text document. The plug-in interprets an image's properties and distinguishes the following image types:
- base64 image - an image embedded directly in a document HTML
- image from foreign website - image referenced by URL, but the URL doesn’t match the plug-in RESTful get handler
- image uploaded - image referenced by URL and the URL matches the plug-in RESTful service get pattern
If the plug-in doesn’t find any images, it skips the download and upload steps and just updates a document CLOB in the plug-in session state.
If the plug-in collects at least one image, it proceeds to the download step.
Download images from foreign websites
The plug-in collected at least one image with a URL that does not match the plug-in RESTful service GET handler. It attempts to download it over an AJAX request and stores it as a base64 image - ready to be uploaded in the upload step.
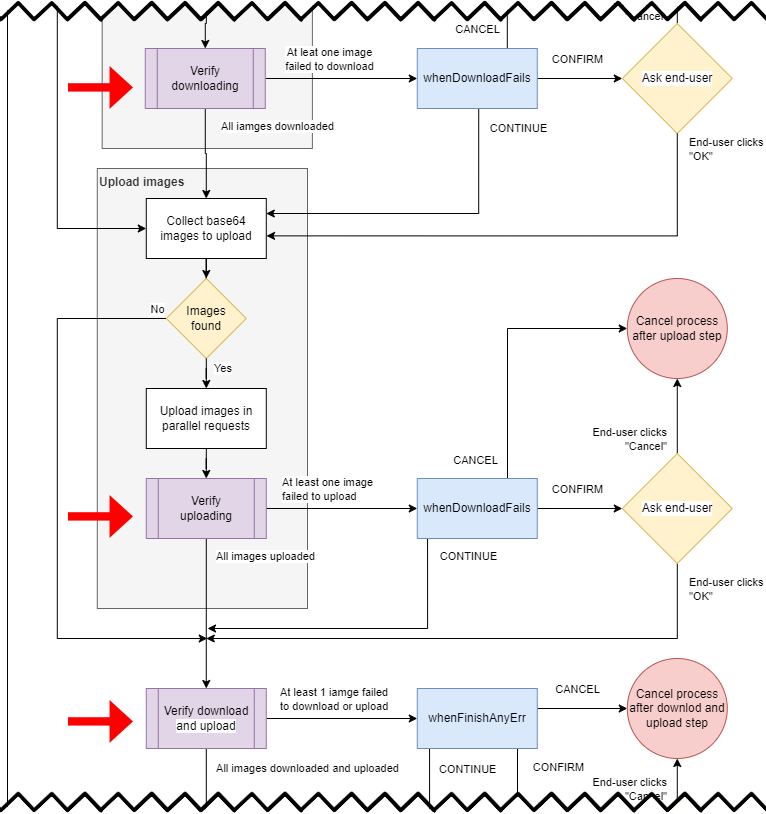
Look at the cropped diagram below and find a purple rectangle with the text “Verify downloading”.

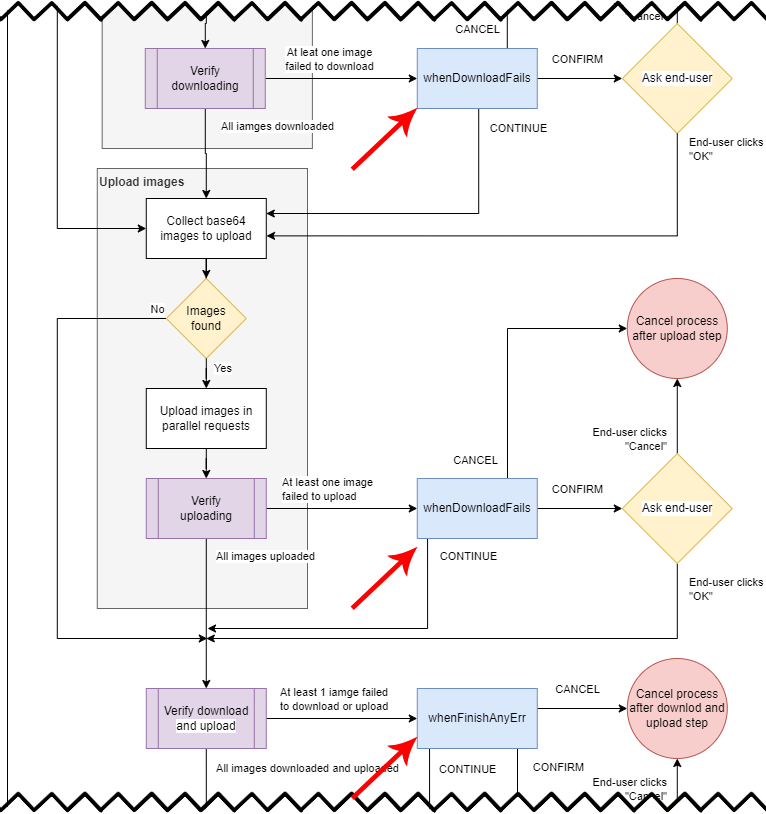
After all images were requested to download, the plug-in checks if any image failed to download. If at least one image failed (for example, due to CORS policy), the plug-in uses a customizable configuration (whenDownloadFails) to:
- automatically cancel the process
- automatically ignore download issues and proceed to the upload step
- notify the end-user about issues and let him decide whether to ignore issues or cancel the upload process
Default configuration
By default, issues at this step are ignored, proceeding to the next step - upload images.
Custom configuration
If at least one image fails to download, you can configure the plug-in to cancel, ignore, or let the end user decide by defining the plug-in JavaScript option upload.whenDownloadFails.
The supported values are the following:
- uc.froala.C_CONTINUE - ignore issues
- uc.froala.C_CANCEL - cancel upload process
- uc.froala.C_CONFIRM - display confirm and let the end-user decide
An example JavaScript Initialization Code:
function( pOptions ) {
  pOptions.upload = {
    "whenUploadFails": uc.froala.C_CONFIRM
  }
  return pOptions;
}
Upload images
Once the plug-in finishes downloading images from other websites (or if no foreign images were found), it’s time to upload collected base64 images.
This step includes images downloaded and images dragged and dropped from the end-user desktop. The plug-in initializes parallel upload requests to the RESTful upload handler and tracks upload results.
Before an image is uploaded, the plug-in evaluates the custom upload query parameters, allowed MIME types, and maximum file size. If any image fails to upload (validation or upload result), the plug-in catches errors per image. It prepares an upload and update summary, allowing the end-user to inspect images that fail to upload along with an error message.
As it was for the download step, the upload requests are verified whether at least one image failed to upload. At this step, the upload and update workflow can be configured to:
- automatically cancel the upload process
- automatically ignore upload issues and proceed to the next step (verification after download and upload)
- notify the end-user about issues and let him decide whether to ignore issues or cancel the upload process
X failed to upload, and Y uploaded
If some images fail to upload and others don’t, you don’t have to worry about re-uploading images on the next try. Images that were successfully uploaded are automatically updated in rich text documents. If you don’t abandon the draft document, you can use the supporting process plug-in to handle already uploaded images.
Upload customizations
- upload parameters can be static when defined via the plug-in attribute JavaScript Initialization Code
- upload parameters can be dynamically evaluated when defined using supporting dynamic action Upload Parameters
- Allowed maximum file size for an image and allowed MIME types can be defined using plug-in attribute JavaScript Initialization Code and Froala options imageAllowedTypes and imageMaxSize
Default configuration
By default, the update and upload workflow ignores issues at this step, proceeding to the verification after the download and upload steps.
Custom configuration
If at least one image fails to upload, you can configure the upload and update workflow to cancel, ignore, or let the end user decide by defining the plug-in upload.whenDownloadFails property.
You can use the following values:
- uc.froala.C_CONTINUE - ignore issues
- uc.froala.C_CANCEL - cancel upload process
- uc.froala.C_CONFIRM - display confirm and let the end-user decide
An anonymous JavaScript function might look like:
function( pOptions ) {
  pOptions.upload = {
    "whenUploadFails": uc.froala.C_CONTINUE
}

  return pOptions;
}
Verification after download and upload step
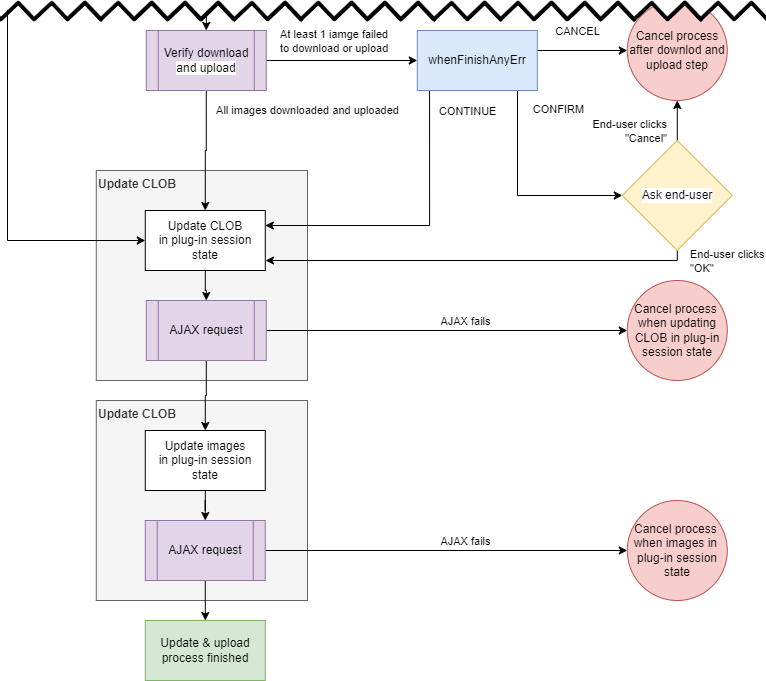
By default, the verification step is executed after the download and upload step. It is used to check if any issue was raised for these steps. This results in preserving the prior implementation when the end-user was notified that all images were processed. We don’t want to disturb end-users just for download issues (yet!), and we don’t want to stop on the first upload error raised.
Look at the cropped diagram below and search for the purple rectangle Verify download and upload. It is the last moment for the plug-in to handle download and upload issues (or leave it up to the user).
Just as in the download and upload step, the plug-in can be configured to:
- automatically cancel the upload process
- automatically ignore download and upload issues and proceed to the next step
- notify the end-user about issues and let him decide whether to ignore issues or cancel the upload process
Custom configuration
If at least one image fails to download or upload, you can configure the plug-in to cancel, ignore, or let the end user decide by defining the plug-in JavaScript Initialization Code. You can use the following values:
- uc.froala.C_CONTINUE - ignore issues
- uc.froala.C_CANCEL - cancel upload process
- uc.froala.C_CONFIRM - display confirm and let the end-user decide
An anonymous JavaScript function might look like:
function( pOptions ) {
pOptions.upload = {
"whenFinishAnyErr": uc.froala.C_CONTINUE
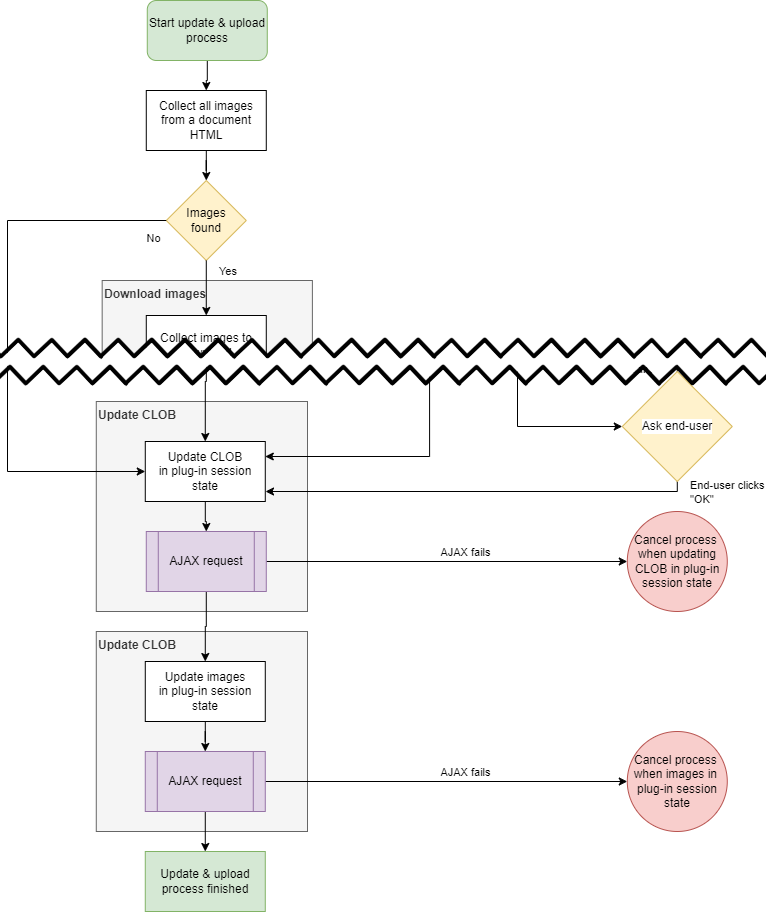
}Update the document in the plug-in session state
After all images are processed, the plug-in updates a rich text document in the plug-in session state, ensuring the plug-in draft CLOB is up to date. This step performs an AJAX request that updates the CLOB, which can fail only when an unexpected PL/SQL error is raised. For example, when the APEX session expires.
When the supporting dynamic action triggers the update and upload process, Upload Images on Demand, the JavaScript fail callback can be executed.
Update image statuses in the plug-in session state
This is a very important step from the perspective of the plug-in handling images. In this step, the plug-in updates its session state, ensuring that the supporting process plug-in can be utilized to handle uploaded images. As mentioned in the previous article, the plug-in tracks all images added to rich text documents. The plug-in is aware if the uploaded image was present in a rich text document on page load, whether uploaded images are duplicated or removed. Based on this step, the supporting process plug-in allows you to handle uploaded images in a currently edited document context.
As it is for updating documents, this step can fail only when an unexpected PL/SQL error is raised when updating images in the plug-in session state. If an error is raised, the end-user is notified about the issue. When the update and upload process is triggered by supporting dynamic action Upload Images on Demand, the JavaScript fail callback can executed.
Upload and update workflow summary
When the uploading process is initialized, the end-user can track the progress directly in our rich text editor.

When the upload and update process is canceled or fails, the end-user can preview which images failed to download or upload.
Why automatically cancel the upload and update process?
You might wonder why you want to cancel the process on any step. I’m happy to give you some examples:
Prohibit end-users from creating documents with images from other websites
If you automatically (or on the end user's demand) cancel the process after downloading issues, you can ensure the document won’t include images from other websites. If the end-user could copy and paste the image from another website, but your CORS policy blocks the download of it by the plug-in, you can instruct the end-user to download an image to the desktop manually and add it using drag and drop. Images dragged and dropped are always added as base64 images ready to be uploaded.
Prohibit end-users from creating documents with base64 images
If you automatically (or on the end user's decision) cancel the process at the upload verification step, you can ensure the end user replaces or removes troublesome images before saving a document.
Why automatically ignore issues?
Ignoring all issues is not a good idea, but ignoring issues up to some point might be interesting for you. This applies to the default configuration, where we don’t want to bother end-users with less significant issues. For example, maybe your policies allow referencing images from other websites, and you want to be strict only when uploading images. It’s fine; you can ignore download issues but cancel all upload issues (or let the end user decide).
Why ask the end-user?
If you want to give your end-user more flexibility in dealing with download and upload issues, you can rely on his/her needs. Maybe, when they are working on a draft document, and it doesn’t matter that images are using external URLs, It’s up to you, and you can let the end-user decide when to ignore issues and when to cancel the process.
Sample application example page
Go to the plug-in sample application and navigate to the Examples \ Update & Upload Workflow.
The new sample application lets you play with the upload and update workflow using predefined images that will fail to download or upload.

Conclusion
Rich Text Editor Pro version 23.2 introduced a fundamental change in handling images. I hope you will find our Rich Text Editor Pro an exciting alternative to the native component.
In the documentation, you can check the highlighted features of our plug-in compared to the native Oracle APEX rich text editor:
I wish you happy editing of rich text documents with uploaded images in your Oracle APEX application.

Comments
No comments yet, be the first one to let us know what you think of this article!