Using AOP to Create a Product Sheet with Images and Conditional Formatting
.91a06b5.svg)
Thursday, February 25, 2021
In this blog post we're going to generate a product sheet using some pretty cool APEX Office Print (AOP) features like image tags and conditional formatting. The Products page (page 3) in the Sample Database Application is our starting point.
First thing to do is add a column to the Products Interactive Report. This will be a link column used to generate the product sheet for that particular product.
Create a hidden Page Item named P3_PRODUCT_ID which will be used to pass the id of the selected product to the AOP SQL query. Select the
PRODUCT_SHEET column in the Interactive Report and give it a type Link. Next, in the Link section, use the following settings:
PRODUCT_SHEET column in the Interactive Report and give it a type Link. Next, in the Link section, use the following settings:
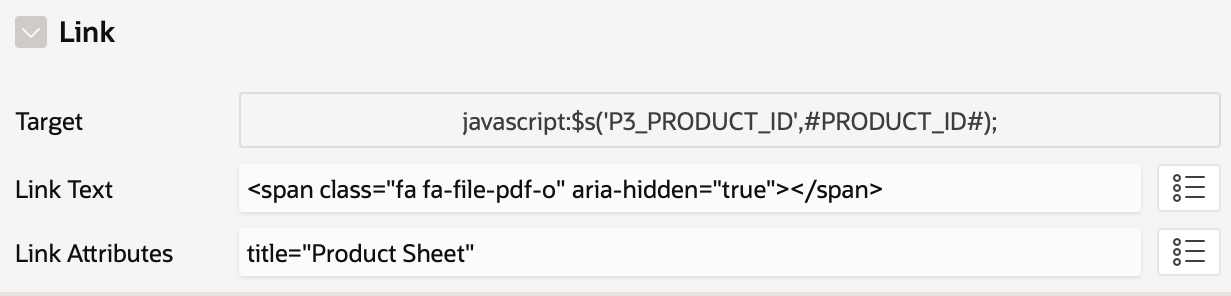
The javascript used for the target simply sets the value of our page item, P3_PRODUCT_ID with the id of the product we selected by clicking the link.
Tip: Bookmark the Icons section of the APEX Universal Theme application. This application is really helpful as it allows you to search for icons and copy the exact HTML code you need.
Create a Dynamic Action UC - APEX Office Print (AOP) - DA [Plug-In] for a Change event on the P3_PRODUCT_ID Page Item with the following settings:
- Template Type: Static Application Files
- Template Source: product_sheet_template.docx
- Data Type: SQL
- Output Type: PDF (pdf)
The Data Source is the SQL query below:
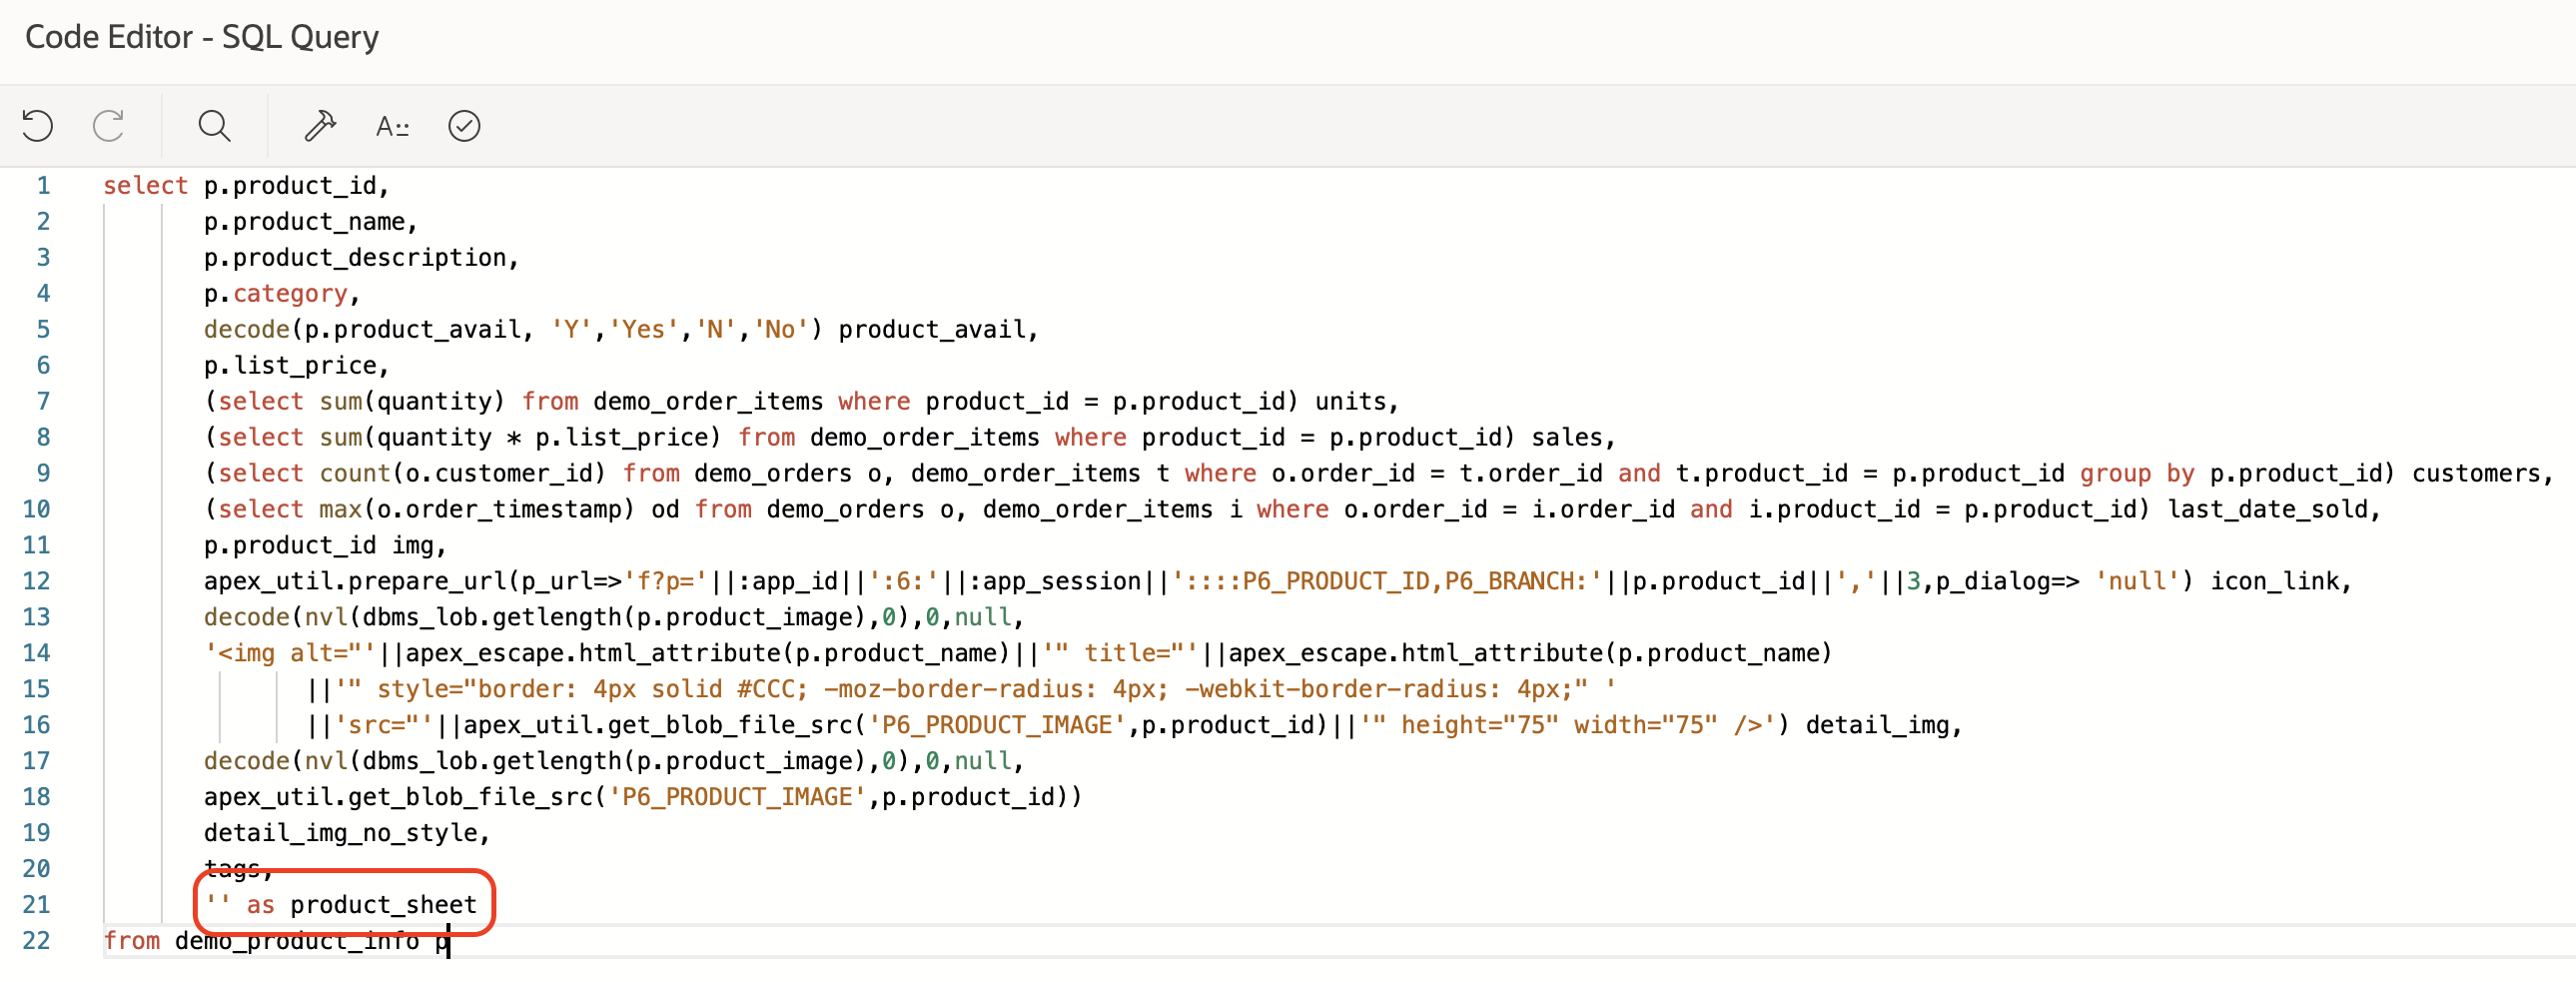
select
    cursor(
        select p.product_name,
               p.product_description,
               p.category,
               p.product_avail,
               to_char(p.list_price, 'FML999G999G999G999G990D00') as list_price,
               apex_web_service.blob2clobbase64(p.product_image) as product_image,
               100 as product_image_max_width,
               100 as product_image_max_height,
               cursor(
                   select c.cust_first_name as first_name,
                          c.cust_last_name as last_name,
                          to_char(o.order_timestamp, 'DD-MON-YYYY') as order_date,
                          oi.quantity
                     from demo_order_items oi
                     join demo_orders o
                       on o.order_id = oi.order_id
                     join demo_customers c
                       on c.customer_id = o.customer_id
                     where oi.product_id = p.product_id
               ) as orders
          from demo_product_info p
         where p.product_id = :P3_PRODUCT_ID
    ) as "data"
  from dual
Images need to be encoded as base64 in order to be sent to AOP. Luckily, Oracle APEX has us covered with the blob2clobbase64 function! If we want our image to fit nicely inside the space we have provided in our template, we also need to tell AOP how to handle their size. By providing additional columns ([image_column_alias]_max_width and [image_column_alias]_max_height), AOP will scale the image proportionally in the output. More information about working with images can be found in the AOP documentation.
Don't forget to set the P3_PRODUCT_ID item in Affected Elements section of your AOP dynamic action.

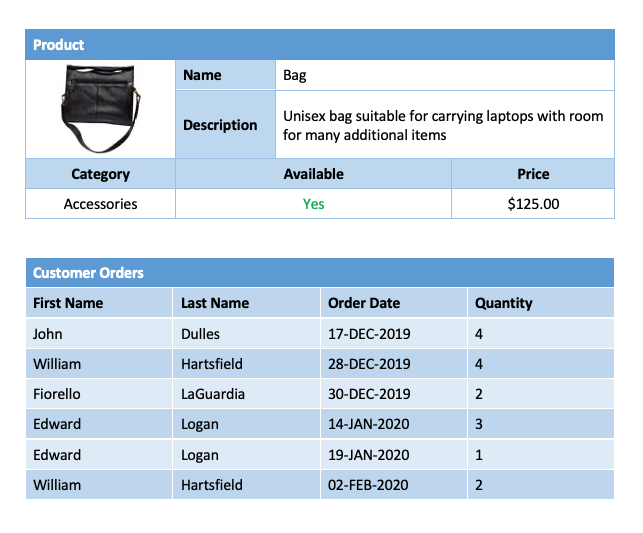
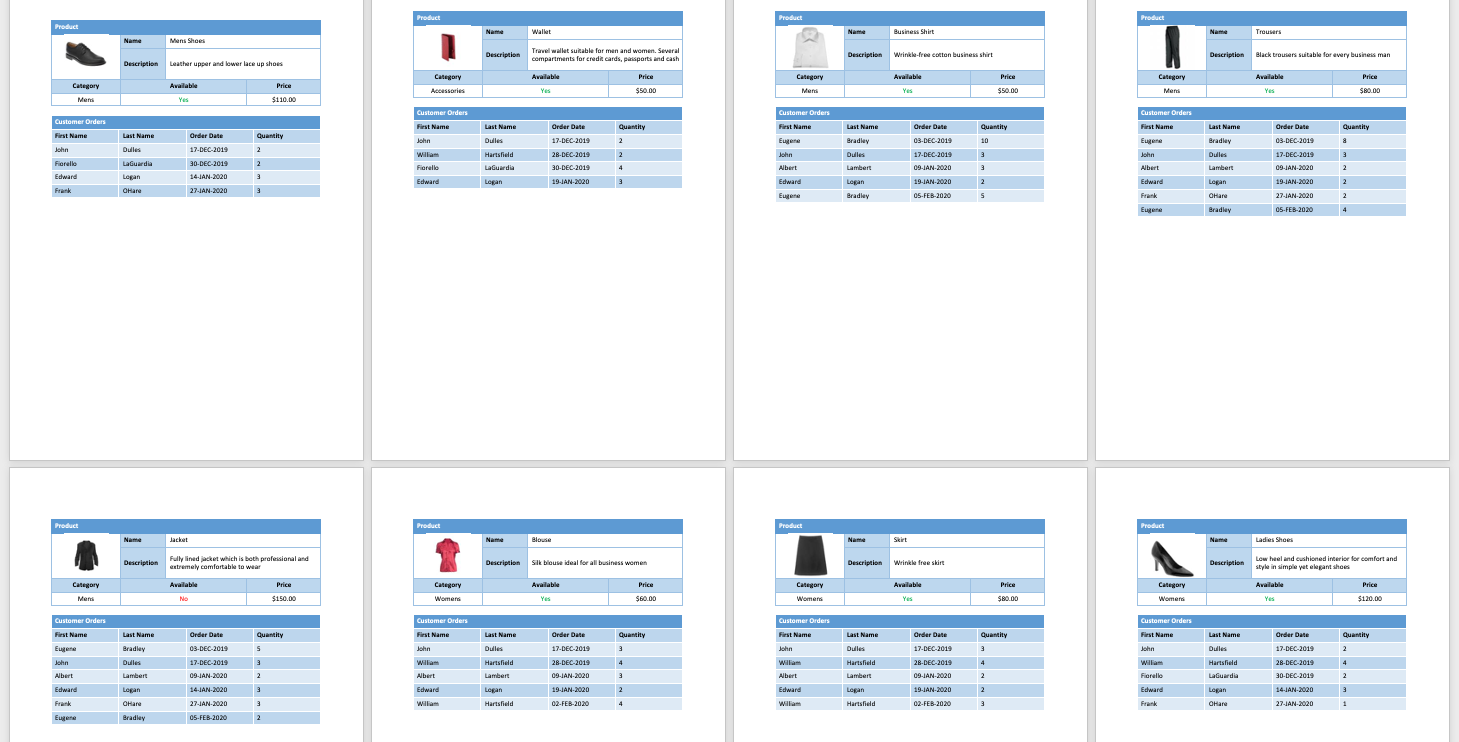
The product sheet contains some basic product information and an overview of customer orders. The template contains two tables, one for each section. You can use any of the styling features available to you natively in Word in order to get the look and feel of your template exactly how you want it.

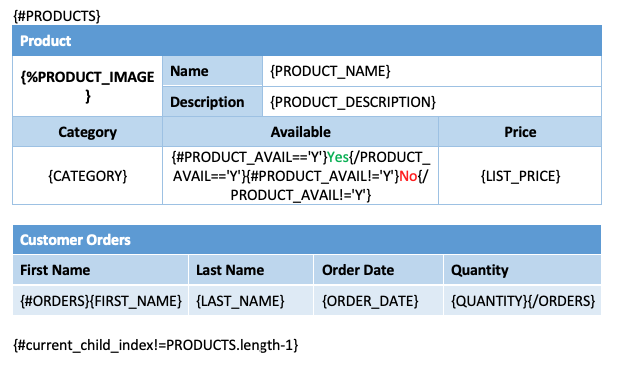
Notice the special {%imagekey} tag that begins with a %. The % tells AOP to render the data (our base64 image data) in this tag as an image.
There's also conditional formatting to dynamically list the product's availability based on the data we have about that product. In AOP, expressions can be used to modify output based on values within tags. For example, {#PRODUCT_AVAIL=='Y'}Yes{/PRODUCT_AVAIL=='Y'} will print Yes when the value of PRODUCT_AVAIL = 'Y'. There are many expressions you can use; more information and examples can be found in the Simple angular like expressions section in the AOP documentation.
At the bottom of the template, the {#ORDERS}…{/ORDERS} tag will loop over the customer's orders that contain the selected product.
Upload the template (product_sheet_template.docx) to the Static Application Files and we're ready to go! When clicking the icon in the Products report we get a nice product sheet!
Okay, so far so good. But wouldn't it be nice to have the same overview for all products? Well, with a few changes, we can do this quite easily with AOP!
On the Products page, create a button EXPORT_ALL. The Action will be Defined by Dynamic Action. Duplicate the Dynamic Action created above, modify the event and change these settings:
- Template Source: product_sheet_all_template.docx
Since we're going to list all products, we need an extra cursor in the SQL query (think of the cursor as a loop - in this case we need to loop through all of the products):
select
    cursor(
        select
            cursor(
                select p.product_name,
                       p.product_description,
                       p.category,
                       p.product_avail,
                       to_char(p.list_price, 'FML999G999G999G999G990D00') as list_price,
                       apex_web_service.blob2clobbase64(p.product_image) as product_image,
                       100 as product_image_max_width,
                       100 as product_image_max_height,
                       cursor(
                           select c.cust_first_name as first_name,
                                  c.cust_last_name as last_name,
                                  to_char(o.order_timestamp, 'DD-MON-YYYY') as order_date,
                                  oi.quantity
                             from demo_order_items oi
                             join demo_orders o
                               on o.order_id = oi.order_id
                             join demo_customers c
                               on c.customer_id = o.customer_id
                             where oi.product_id = p.product_id
                       ) as orders
                  from demo_product_info p
            ) as products
          from dual
    ) as "data"
  from dual
In the Affected Elements section of the AOP dynamic action, clear the Selection Type as we don't need the Page Item P3_PRODUCT_ID anymore.
The template is pretty similar as the previous one:
We start by opening the Products cursor (or loop) using the {#PRODUCTS} tag to be able to list all products. Each product should be on a separate page, that’s why there is a special tag at the bottom: {#current_child_index!=PRODUCTS.length-1}. Insert a page break after this tag, the last line of our template will be on a second page:
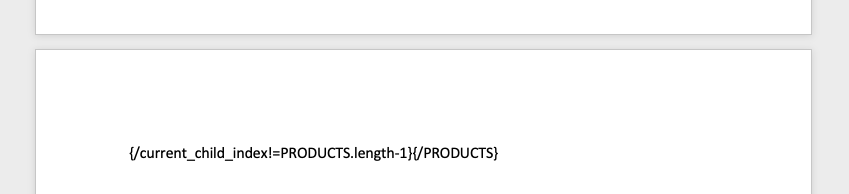
By using this tag we're making sure that every product will start on a new page. The page break will only occur when the product is not the last one in the loop. Don't forget to close the Products cursor using the {/PROJECTS} tag. Upload the template (product_sheet_all_template.docx) to the Static Application Files.
If everything went according to plan, clicking the EXPORT_ALL button should generate a full product overview!
I really hope that these examples can help you with what you want to achieve with AOP. If you want to explore more examples, make sure to try out the online version of the AOP Sample Application!
Kevin.
Author: Kevin Thyssen

Comments
tom
Friday, April 28, 2023
Does the pdf generation process support the creation of Table of Contents, Page Numbering, Bookmarks(very important to us). Product looks very interesting. Thanks, Tom